This post will explain Apache Directory Studio features for LDAP. http://directory.apache.org/studio/ (Download it from here)
Apache Directory Studio is Eclipse based LDAP browser and directory client. My last post briefs about the LDAP. Here we will create a LDAP structure for Company called 'myCompany' that has 3 department with list of users. Here is LDAP structure of 'myCompany'
MyCompany
|
|--production
| |
| |--guy1
| |--guy2
|
|--sales
|
|--guy3
|--guy4
|--guy5
[1] Create a New Server
[1.1] Open Apache Directory Studio.
[1.2] Go to File, and click New.
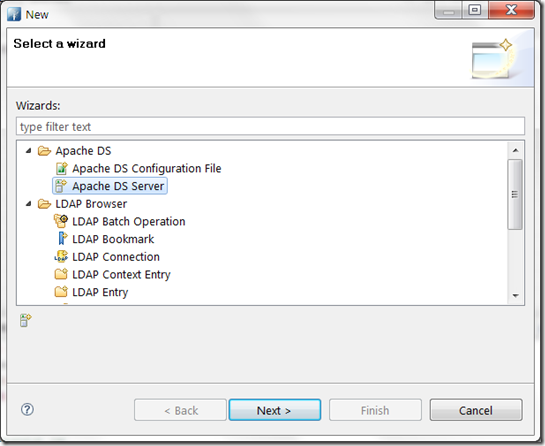
[1.3] In popup window click Apache DS folder for to expand it, and select the Apache DS Server
[1.4] Click Next.
[1.5] Enter any name for the server. For example, 'MyCompany' then click on Finish.
[1.6] A new server will be shown in Servers panel.(Window > Show View > Apache DS > Servers)
[2] Start Server
[2.1] Select server from Servers panel, then click the Run button.
Your server should now be running.
[3] Create a New Partition
To add MyCompany to the root tree, we need to create a new partition. Therefore Everything on mycompany will be in this new partition.
[3.1] Go to the Servers panel, and right-click your server.
[3.2] Select Open Configuration.
[3.3] Change Port if you wish to change the port that server to run.
[3.4] Click the Partitions tab in bottom of configuration(server.xml).
[3.5] Click on Add and enter the below details for this new partition.
ID: mycompany
Cache Size: 150
Suffix: o=mycompany
[3.6] Save changes by pressing (Crtl+S)
[3.7] Restart Apache DS server and refresh the LDAP Browser panel.
[4]Create a Connection
To browse the contents of the server
[4.1] Right-click on your server.
[4.2] Select LDAP Browser
[4.3] Select Create a Connection.
[4.4] Go to the Connections panel. (Window > Show View > LDAP Browser > Connections)
Make sure server is running
[4.6] The LDAP Browser panel should refresh and show the contents of the server.
[4.7] Expand the Root DSE folder. There are two sub-entries: ou=schema and ou=system. (do not Change them)

[4.8] Click on the Root DSE folder. A new editor will open
namingContexts attribute value shows as o=mycompany in the lists. However it doesn't show under the Root DSE tree because we need to add the organization manually in the tree.
[5] Add the Parent Organization
Our company is an organization. In LDAP, to represent a company we use the organization object which is represented by the alias o.
[5.1] Right-click on the Root DSE folder. Select New > New Context Entry
[5.2] Select Create entry from scratch then Click Next.
[5.3] Find the organization object and select it then click Add
[5.4] Now we need to enter a Distinguished Name (dn). Click on the pulldown menu. Select o=mycompany.
[5.5] Click Finish.
Notice the new partition now appears under the Root DSE.
[6] Add the Organizational Units
In LDAP, to represent an organizational unit we use the organizationalUnit object which is represented by the alias ou. So if we have a unit name production, the Distinguished Name (dn) is ou=production,o=mycompany. It's a naming convention.
[6.1] Right-click the o=mycompany entry. Select New. Select New Entry.
[6.2] Select Create entry from scratch.
[6.3] Find the organizationalUnit object. Select it then click Add. 
[6.4] Click Next. Now you need to enter a Distinguished Name (dn).
The Parent field should read o=mycompany.
On the RDN field enter ou. On the value field enter 'production'
[6.5] Click Finish. We've just created the ou=production organizational unit.
Same way create ‘sales’ Organization unit.
[7] Add the Staff
We'll represent each person using the inetOrgPerson object. That class holds attributes about people. An inetOrgPerson can contain a user id (uid) and password (userPassword) which will be useful later for authenticating users from using LDAP.
Here are the steps we need to do:
[7.1] Go to the LDAP Browser panel Right-click the ou=production entry.
[7.2] Select New. Select New Entry.
[7.3] Select Create entry from scratch. Click Next. The Object Classes window will appear.
[7.4] Find inetOrgPerson object.
[7.5] Click Next. Now you need to enter a Distinguished Name (dn).
The Parent field should read ou=production,o=mycompany.
On the RDN field enter cn. On the value field enter madhuka udantha.(<PersonName>)
[7.6] Under the sn attribute, enter Udantha(sn stands for Surname)
[7.7] We need to add a username for this user. Right-click on the same window. Select New Attribute. The Attribute Type window will appear.
[7.8] On the Attribute type field, enter uid. This will serve as the username of the person.
[7.9] We are back on the Attributes window. On the uid attribute value, enter madhuka
We need to add a password for this user.
[7.10] Add userpassword
[7.10.1] On the Attribute type field, enter userPassword. This will serve as the password of the person.

[7.10.2] Click Next, then click Finish.
[7.10.3] It will be asked to enter a password. Enter pass as the new password. Make sure that the Select Hash Method
[7.11] Click OK and FInish
link this way create other user
final you will get the full LDAP this way.


